
Making Nails
by Dave Smucker
with illustrations by the author
Making Nails? Why an article on nail making? After all, nail making is easy or at least looks easy when you see someone else make nails. Many books on blacksmithing show a nail header and devote only a page or so to nail making.
Well here are some of my reasons you should try it and I hope to show you some things that are not in all of those books.
- Nail making is one of the very oldest forms of forging.
- Square hand made nails have 4 times the holding power as a round wire nail.
- It is a great way to learn better hammer control.
- If you want to change the "style" with which you hold your hammer and use it then nail making is a great item to practice on.
- It is a great way to warm up when starting out forging for the day.
- Even though factory nails are cheap, there is a market for hand made nails.
- It is a great demo item, and something that you can make and give away to kids. (Adults should pay for them.)
- Making a good nail header is not hard, unless you follow the information in all of those books.
- It is a fun contest item to test you skills against other blacksmith at local forge meetings.
The Basics
To make nails we start with a round or square rod usually in a size from 3/16 up to say 5/16 in either diameter or square. The ideal material would be very low carbon steel but we can make good nails from either hot or cold rolled mild steel.
We first heat our steel and then draw out the shank of the nail, working on two sides at right angles to each other.
Then using our hot cut hardie we cut most of the way through the stock rod leaving just enough material for the head.
Now, placing the shank of the nail into our nail header we break off the stock rod with a twist and then follow by forging the head on the nail.
Sounds quick and easy – and if you are really really good you can do this in one heat. Most good nail makers will do it in two heats. One to form the shank of the nail and cut almost through on the hardie and then a second heat to heat the now cool head area and forge the head.
Starting out making nails you will need 3 or 4 heats and should not feel bad about more until you get the speed and rhythm down.
There are several variations on this basic method and we will discuss what I will call the "Peter Ross", "Jerry Darnell" and "Tom Clark" approaches later in this article.
A Short History of Nails
Man has been making and using nails for a long time, at least 5000 years and maybe longer. Along with forging of weapons and knives, nails were one of the first metal items made in volume from copper and then iron. Copper and bronze nails continued to be used in shipbuilding as iron came into wide use in other construction. Iron nails from the Romans have been found inBritain.
All of these nails were hand forged one at a time. For centuries, the stock for nails would be hand slit into square cross section from iron that had been pounded out. The "sheet" was most likely made with waterpower heave hammers. Then in 1606, a major improvement was made with the invention of the slitting mill by Englishman Bevis Bulmer. This slitting mill could cold shear a series of square sections from a thin bar of wrought iron. Bundles of these nail rods were "loaned" to local folks who would convert them to nails often using the home hearth as their forge. They would then be paid by weight of good nails returned less some allowance for waste. Most of this work took place on British farms and everyone made nails from kids to grandparents. The pay was very low.
Nail making inAmericafollowed a similar pattern with most of the nail stock coming fromEngland. Nail stock has been found atJamestownso local forging of nails took place from the very start in theUSA.
In 1775, Jeremiah Wilkinson, aRhode Islandinventor devised the first machine to make cut nails from iron sheet. By 1795 there where machines that could cut and head nails in one operation.
Nail making didn't really change again until after the large volume production of mild steel by the Bessemer Converter process. By 1880, mild steel wire was being produced and the wire nail became king because of its lower material / high volume production. Most nails today are wire based with some cut nails still being produced. Increasingly, nails being driven by pneumatic nail guns to the point where some construction workers today don't seem to know how to hand drive a nail.
Making a Nail Header
First, we need a nail header and you can easily make your own. Or you can purchase a very good nail header from Tom Clark for about $ 35.00. Tom makes these himself and they are not something that he imports.
If you want to make your own, there is one very important thing to keep in mind "DON'T MAKE IT LIKE WHAT IS SHOWN IN THE BOOK." Now what do I mean by that strong statement? Well, I have looked in 7 different books I have on blacksmithing and all 7 show a form to the nail header that will not work without modification – and none of these books tell you what to do.
They all show a form like the following for the opening in the header. A square tapered hole in a domed forged with the taper larger at the bottom and a sharp top edge. In other words a square hole, punched from the bottom of the tool.
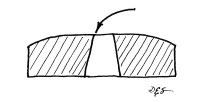 Sharp Corner
DO NOT make a nail header like this
If you make a nail header like this with that sharp top edge what happens? When you go to head the nail a small amount of metal is forged downward into the hole in the header. Because of the mass of the metal in the shank of the nail and because the metal right at the head is usually hotter you will get a small amount of upsetting just below the sharp edge of the nail header. This upset is now larger than the opening at the top of the nail head and locks the nail into the header. "Game Over".
However, if we look at all of the old historical nail headers, they were made this way – how did they get them to work?
One of two ways, and swearing wasn't one of them. One of the ways was to very carefully file or dress that sharp edge to remove it and give some top relief to the header.
It looked something like this.
|
 Rounded Corner
This will work.
The second method was to first punch through or nearly through from the bottom side. Then reverse the punch and punch gently through from the top forming a somewhat hourglass form. I say somewhat because the waist of the hourglass is close to the top of the tool. This form may also have been dressed with a file. I think that this is the most common form on historical headers.

|
I have had good luck with this form.
I find that in making nail headers rather than using a very small needle file required to fit the hole that I can dress the hole using a small strip of emery cloth.
Now Tom Clark has done just the opposite. He puts the taper hole in the nail header with the large side at the top and small side at the bottom. He is also very careful to make sure that the header has no sharp edges. Looking carefully at the Top Clark Header my guess is that he dresses the hole with emery cloth as I do.
Here is the way the section looks through a Tom Clark Nail Header.

|
This form also works very well
What steel should you use for a Nail Header?
I have seen workable nail headers made from mild steel. Not my choice because when I take the time to make a tool, I want it to last a long time. Tom Clark makes his nail header from 5160 – a good choice. The nail header that Jerry Darnell has with which he has made 1000's of nails is made from the end of automotive steering or suspension rod. I also like W1, O1, 4140 or 4340. S7 or H13 would also be good choices. The problem with the last two steels, since they are air hardening, once you get them hot, you can't drill or file them, any finishing work is going to be by grinding or polishing them with emery cloth. Historically, W1 or similar high carbon plain steel would have been used. The W1 tool steel "bit" would have been welded to a wrought iron backer bar as a handle.
5160 is a good place to start because most of us can put our hands on a used leaf spring – which is most likely 5160. Tom Clark, since he is selling his nail headers only uses new 5160 material, but for most of us, a leaf spring will do.
Tom makes the Header shown here by first drawing out the handle on the power hammer and then forming the head. He rounds that on the power hammer and then takes another heat and dishes the head using a fixed female bottom tool and a hand held male top tool.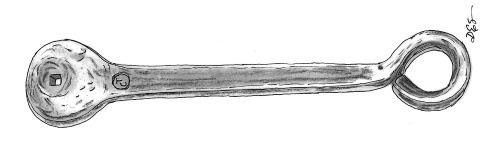
He then puts in the taper hole and dresses the tool. Before he sells it, he makes a nail to make sure there are no problems.
It will be some work, but you can do all of these steps without a power hammer. Or you can weld a handle onto a smaller piece of leaf spring and then dish the tool in a swage block, especially if you have the help of a striker.
 In this photo Tom is putting the dome in his nail header under the power hammer.
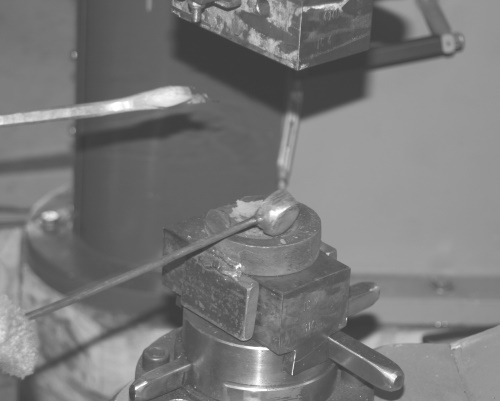 In this photo are both the bottom tool and the top tool used to form the dome on the working end of the nail header.
My method is a little different and you might say it is a machinist or welder's approach.
I first grind a domed surface on the end of a round piece of tool steel.

I just do this free hand on a 2 X 48 inch belt sander but you could also do this with a 4 & 1/2 inch angle grinder. Or, being a blacksmith, you could forge it on.
Then I cut off a small slice of the tool steel about 1/4 inch thick. The reason to dome the end before cutting it is that is much easier to hold and grind a piece that is a foot or so long. You can try making this cut in a horizontal band saw if your tool steel is annealed, but a chop saw will work with hard material and save your saw blade for mild steel.
Now, weld your disk of domed tool steel to a mild steel bar which will become both the backing material and handle. I do this with a disk on each end so that I can have two nail header sizes in one tool.
Then anneal your welded up tool. To do this, heat the whole tool to above critical temperature and then place in vermiculite. It you don't have vermiculite, wood ashes or lime will work. By heating the whole tool – the tool steel part will anneal better because the overall tool will cool slower. You will not be able to anneal S7 or H13 using just a forge, you just can't cool it slow enough.
If using S7 or H13, drill your hole in the disk before welding to the back bar. It should be "soft" as it comes from the supplier.

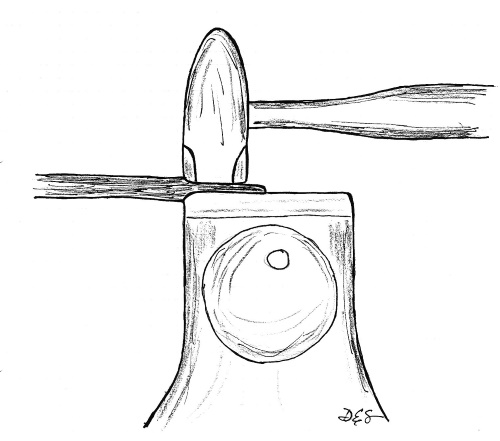
Now drill a hole in the center of your domed areas. This hole wants to be about 2/3 of your finished nail square dimension. (You could also punch this hole but you will get less distortion by drilling.) I also add a hole so that it can hang on the wall.
Backside of Header, note the relief drill in the backer bar. The other hole is for hanging.
Now heat your tool up and drift your hole to a tapered square form. Like Tom Clark, I drift this one from one side so that the hole is bigger at the top. I have also made nail headers with taper in both directions, just make sure you have that top taper that goes about 1/3 of the way through your tool steel.
Last step is to dress your tool. To do this I use 120 or 180 emery cloth. Tear some very narrow strips (1/8 to 3/16 inch wide) and work them back and forth through the hole to polish all surfaces and especially the edges. This is the most important step in making a nail head – so that the nail doesn't stick.
You can also make a Nail Header similar to mine using the head of a Grade 8 bolt.
Because Grade 8 bolts are made from a high strength alloy steel, they will make a good nail header. A 3/4 inch bolt makes a nice size. You first dome the head of the bolt by grinding and then drill your starting hole that will be drifted square in the center of the bolt head. Next cut off the bolt head leaving a few threads. These threads can then be used to attach the bolt head to your backing bar / handle by tapping a hole. Alternately, you can cut the head off flush and weld it to the backing bar / handle. If you go the threaded route, you will want to drill from the underside with a larger hole so that you will be drifting only a depth of 1/4 to 3/8 of an inch.
Making your square tapered DRIFT.
In all of the methods for making a nail header that we have shown here you will need a square tapered drift for completing the hole in the Header. This drift should have a taper of 10 to 12 percent over its working area. In other words, taper of about 1/8 inch per inch of length. A very shallow taper such as 5 percent or less will not work for a header because such a taper is self-locking and the last thing you want is a self-locking taper. What is a self-locking taper? Think of the Morse Taper you will find on some drill bits and in the spindle of your drill press. Once set you have to drive out a Morse Taper. A Morse Taper is approximately 5 percent.

To make my square drift shown here I start with a square lathe tool bit. I dress one end flat with rounded corners and then grind the taper onto the lathe tool bit. To do this grinding I hold the tool bit in the jaws of a vise set at the approximant angle I want for the taper. I then use a 4 and 1/2 inch angle grinder to grind the taper on one side at a time. If you work slowly and carefully, you can produce a very good drift this way. Because a lathe tool bit is made from high-speed tool steel, you will have a drift that will handle hot temperatures and never wear out. You can buy lathe tool bits from MSC or Enco or find a machinist friend to give you a few. For these nail headers I used a 1/4 square bit. You can also use a 5/16 or 3/8 square bit. One major caution – DON’T DRIVE THIS DRIFT WITH YOUR GOOD FORGING HAMMER. The tool bit is very very hard and you will damage the face of your hammer. That is why you need a "junk face" hammer at your forge. I use an old stonemason's hammer for that function.
You can make your drift from other steels besides a lathe tool bit. W1, O1, S7, H13, 5160, 4140 or 4340 will all make good tapered drifts. You can forge the taper of such a drift and finish it by grinding. I would not use mild steel (A36) You can drift a few holes with a mild steel drift – but if you are going to make a tool and put time into it why not make one that will last. Round drifts can be made from mild steel. They are easy and quick to make and they are uniformly loaded in use. Square drifts take more time to make and the corners of a square drift are highly loaded when drifting. Make them from a tool steel.
Making Nails
We now have a nail header – So let's get on with making nails. As noted before, you can use either square or round stock. Depending on the size of your header, a stock size from 3/16 to 5/16 of an inch is common. Historically, nail stock was square in cross section. It was first cut by hand from flat forged bar stock of wrought iron and later cut on a slitting mill into nail stock.
In the "Tom Clark" method of nail making, we heat our stock and then extend a short portion on the anvil and draw out a taper working back and forth between two faces. Typically, we will get a nail length that is about 3 times the length that we lay onto the anvil. So for a 2-inch nail we would start with about 3/4 of an inch on the anvil. By not laying more material than this on the anvil we retain heat in the stock we are going to use for the head. We don't worry about and don't really want a sharp point.
Once we have our taper we now use a hot cut hardie to cut most of the way through our stock just back from the taper leaving enough material for the head. We don't want any more material here than about the diameter or width of the stock. Too much material for the head and it will fold rather that upset when we forge the head.
If your vise is at hand consider putting your hardie in the vise rather than into the anvil. This way you can leave it in place as you make nails. Please don't leave your hardie in the anvil while doing other operations at your anvil – it is very easy to cut off a finger or seriously hurt yourself with that hardie sticking up in your anvil. (Watch for it in the vise too, but here at least it is usually out of the way.)
Tom Clark now does a neat little thing just before he takes a second heat to make the nail head. He taps the partly cut through nail and stock so that he get a form that looks like this.

|
This allows him to go back into the fire with the nail tip up and out of the hot part of the forge.
Now he goes to the header, twists off the stock rod and forges the head using a central upsetting blow followed by four quick blows to forge the facets of the nail head.
The Peter Ross Method.
I haven't seen Peter make nails so I am basing this method on what Ron Howard has told me and the way he learned to make nails from Peter. In many ways, this is similar to Tom's method except that Peter makes a point of setting off the head area at the start of nail making. He uses a half-on-half-off blow to set down the stock from two sides of the nail stock. The nail is then drawn out.
The half-on-half-off blow looks like this.

After the shank of the nail is drawn out the unfinished nail look like this.

Two quick half-on-half-off blows can then move the shank to the center when used on the other side of the shank.

Now cut nearly through with the hardie, place in header, break off and forge the head. Historically a good nail maker could do this in one heat. A good smith could make 100 nails an hour and do it for 10 hours a day. If you have to take another heat, it is not a sin.
One important result of the Peter Ross method is that the shank of the nail is nearly straight with not as much taper as in Tom's method. This means that for the same given amount of metal, Peter's nail is longer. Not a big difference, but in the days of very high price metal vs. labor cost, getting the most nails per pound was important.
The Jerry Darnell Method
Jerry's method is similar to Peter's but with an important difference. Rather than use the half-on-half-off method of shouldering that Peter teaches, Jerry uses the hammer to shoulder from the top and the anvil edge to shoulder the bottom.
This means that when the nail shank is forged only the final steps of cutting off and forging the head are left. Also, because there is no contact with the rest of the stock it retains most of its heat. While it may be hard to believe, I have seen Jerry make two nails in one heat. Each nail was about 1 inch in length. Historically, really good nail makers would have used this high hammer control method. (I suspect that Peter would use the same method as Jerry when making nails himself but teaches the half-on-half-off method of shouldering because it is much easier to learn.)
Here is a sketch of two Jerry Darnell nails I have from one of his classes at theFolkSchool.
Light that forge and go make some nails. Have a nail-making contest at your local forge group. It's fun. If you can advance to the Jerry Darnell method of nail making, then your hammer control will have advanced to the point that you will be a much better smith.
